Friday, 19 March 2010

3D Photography - how do I start?

Hi everyone!

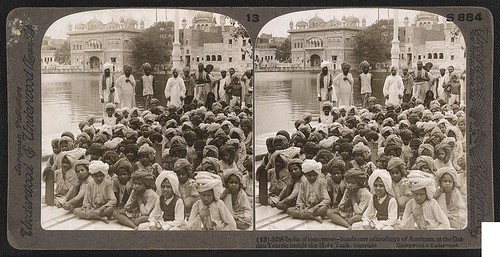
Todays topic is 3D photography. Many people are only discovering 3D photography but not many of us know exactly that 3D photography was actually first done in the mid-1800s. Many portraits of royals, important societies and buildings were shot using a 2 camera set-up and the prints were then viewed through special viewing binoculars which then gave the images their 3D effect. In hindsight it was quite ingenious actually but quite inevitable. 

A simple (THE simplest way i've found) to create a 3D image (and i've only really done one so far..) is to take a photo of your subject through your left eye then move the camera to your right eye and take the same shot. Assuming you kept everything relatively level and your focus was on the subject at hand everything will fall into place nicely.

Processing

There are 3 methods of processing each with their own difficulty level. The easiest way is to put the two images side by side. Done. Now you have to try and see the 3D image by crossing your eyes - many people find this part the hardest but i've written a sure fire way you can learn to see 3D Cross View images:

1) pick out a point on the photos which stands out - an area of contrast perhaps or a particular person. 
2) Look at the two side-by-side images but put your index finger 6 inches in front of your face in between the line of sight of your eyes and the photos. 
3) Look at your fingertip.
4) move your finger forward and backward (while keeping your focus on your fingertip!) until the two photos overlap in the background. You should slowly see the area you picked out in point 1 overlap.
5) shift your gaze to the point you picked out in step 1.
6) allow your eyes to adjust to the image and move your finger out of the scene - if you are straining too much relax and try again. And remember to keep your head and eyes level otherwise it wont work.

Once you have mastered this technique you will find that the 3D Cross-View images are far superior to almost any other 3D method as it maintains the colour and lighting of the original images and gives a perceived resolution increase due to each eye having a separate image to look at.

The second method is to use photoshop or a similar peice of software to filter out the red channel on one image and overlap it with the other image. This gives the standard '3D' look of red + cyan. It isnt ideal because a lot of colour is lost, but the image is still in 3D. (I might go over that in a tutorial at a later date - its not that difficult really)

The third method is a GIF animation where each image is shown in a flickering manor. Your brain will process this as a 3D image (and its more on the lines of how 3DTV is processed) but this can only be viewed on a computer screen whereas the other two techniques can be printed.

A Few Examples

Here is an excellent Anaglyph (red/cyan glasses) 3D image: 

This is a 3D image from 1903 shot in India, Amritsar at the Golden Temple. 

And this is my latest 3D photograph using the Cross-View technique

Sachkhand 3D Crossview

Have a go at making your own 3D photograph and send me a link! 

If you found this interesting remember to subscribe or bookmark this page. Also, please join my Facebook group and follow me on Twitter :)

Sundeep Singh Osahn

+44 (0) 7793973248

Posted via email from SunnyPhotography

Friday, 5 March 2010

Nemo acting all cute and innocent!

All together now... "awwwwwww!!!"
yeah, sometimes she's all cute and innocent looking but that doesn't last very long! Admire her in this pose while you can!

Sundeep Osahn
www.SunnyPhotography.co.uk

Posted via email from SunnyPhotography

Thursday, 4 March 2010

Haven't got the foggiest.. or have I?

Last week was a very foggy. It was the result of very cold weather, snow, and then slightly warmer weather. The fog was very thick especially towards the outskirts of Leeds where I live. Here's what I mean...

Photo is taken from inside my limited edition Lamborghini Xsara.. (Yes, that model does exist, except its designed to look like a W-reg Citroen Xsara)

:)

Sunny

Posted via email from SunnyPhotography

Tuesday, 2 March 2010

Wedding Photography Prices: Why Wedding Photos Can Be Expensive

Hello everyone!

This is a question that many couples (and their parents) ask. Especially being an Asian wedding photographer I get told by many clients' parents that my price 'for the day' is too much (mostly because Mr X can do it cheaper). Well, in all honesty Mr X probably can do it cheaper and most likely the photos will look significantly cheaper too. That isnt a bad thing as long as you are ok with it. After all you do get what you pay for and the more higher up the scale you go, the better the images of your wedding.

Anyone can pick up a camera and try to take some pictures, in fact many people now are buying DSLRs and playing photographer (thats how I started!). The key difference between average Joe, Mr X and Mr Professional is the level of expertise, training, technical knowledge and equally important the quality of equipment used. My lenses, as with all the best photographers, are from the professional high end range, they cost over £1000 a peice, some are closer to £2000. The camera itself costs a considerable amount too and I don't skimp out on inferior products or equipment because its 'cheaper'. And being the gadget/technical geek that I am, I know my equipment inside out - every button and every function. That means in any given situation I instinctively know what settings to use in order to produce the type of image I have in my mind. I stay away from harsh flash-shadows and try to gently illuminate the spaces around me whilst keeping all the ambient light around. (eg, pic below). 

A term I learnt from a photojournalist friend is "all the gear, no idea" and that kind of covers it for a lot of inexperienced photographers out there. Using someone who is less experienced might result in photos that you just don't want, dont like, or photos that are just unusable. So it is very important the photographer on your day is competent and has experience covering the type of wedding you are having. 

Another aspect of photography that many people overlook is the post processing. I spend hours, days even weeks post processing images to get the very best out of them. It can be the difference between a good shot and an excellent photo. All the best photographers utilise an element of post processing and some are professionals at that in their own right. Designing an album takes time too and putting in that extra effort can provide my clients with an incredible experience when they look back at their wedding day.  

I could go on for ages but time is against me - I have some designing to do so... For an explanation as to why wedding photos can be expensive, this is an excellent article written by an excellent wedding photographer, Randolph Quan. I would be doing him an injustice by writing my own article on it, so here is the link! http://randolphquan.com/blog/wedding-photography-prices-why-wedding-photos-can-be-expensive/

**Brides to be**
My advice is to budget 10% of your total wedding cost toward photography/videography and hire a professional (separate photographer and videographer is usually better too). Follow that advice and I guarantee you will have photos that will make you smile over and over again. :)

Sundeep Osahn

Posted via email from SunnyPhotography